

Adobe After Effects Color Correction
How to colour grade in After Effects
I've always loved this line from the film 'What About Bob?': "Baby steps, Bob. Baby steps." Colour correction and grading is best approached the same way - one step at a time.
We've always done some kind of colour correction in Photoshop, in our NLEs, and also in After Effects. Colour correction here is the process of making sure all the shots and scenes meet a basic level of good colour. The white balance should be appropriate to the scene, as should the tonal range, general colour and black points. In a sense, the colour balancing stage is about making the live action production team look good.
Not many years ago, at this point you may have been done. But in the last decade or so there's become a heightened awareness of colour subtleties that was rarer before. Work in this realm is called colour grading. We first started seeing this in movies, and then later high-end TV/cable shows, all of which put far more care into the colour hues and tones of their final products.
Setting the tone
You can't help but think of films like Saving Private Ryan, whose cool tones hit us all over the head with how colours sets a tone to a film. More recently - and more subtly - think of high-end broadcast shows like West Wing and cable shows like Mad Men, House of Cards, and Breaking Bad.
A large part of this (r)evolution in colour control is an outgrowth of our digital tools, making this more accessible and affordable. But how to use them, and when, depends on what kind of work are we doing. How critical a project's color, how easy/fast do we need colour correction controls to be, and so on.
If you do a great deal of this kind of work, especially grading work, then you are best served with a dedicated application, maybe a high-end system like Da Vinci's Resolve. More likely a dedicated desktop solution can suite most heavy-duty needs, sytems like Adobe's new SpeedGrade program (part of the Creative Suite), or Apple's Color (alas, now discontinued along with Shake and other Apple solutions).
But not everyone's needs are that lofty, and production workflow can often be enhanced by keeping your work in fewer applications. This is whey many colourists and colour graders prefer working with enhancements to After Effects, using plugins like Colorista and Magic Bullet Looks, both of which help to streamline the process while continuing to work in After Effects.
Working in After Effects
But don't reach for your wallet just yet, as doing all your colour correction and colour grading work inside After Effects using native tools is totally doable, and still very versatile. The trick is to find what native tools best suit your needs.
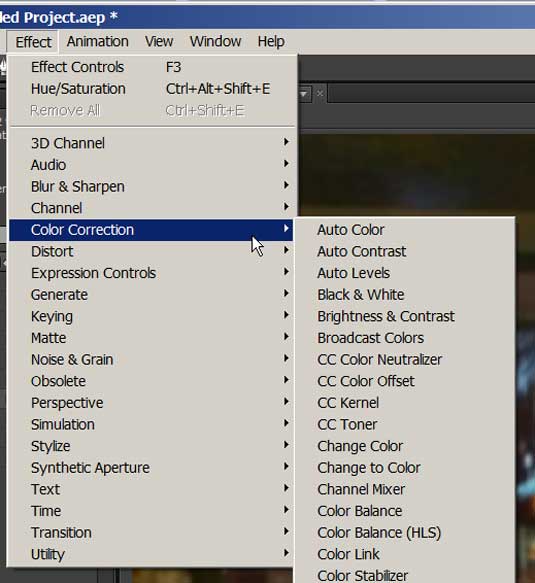
As seen above, After Effects offers many options in its Effect>Color Correction filters. The trick, or the best way to work, is to keep everything as modular as you can, by correcting in passes, and by using Adjustment Layers as much as possible.
First add an adjustment layer and use it to create a basic colour correction overlay pass in your first scene or shot. Maybe the same adjustment layer can be used in the next shot/scene, or you may need to modify it a bit, but keep doing this as you move through your project.
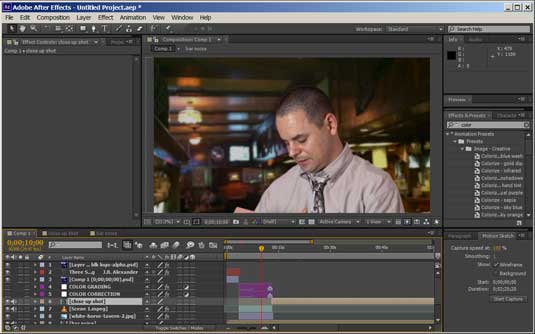
In the next few images we see a sample project where adjustment layers have been added (highlighted in purple). The first image shows the adjustments turned off, so you see the footage as shot:
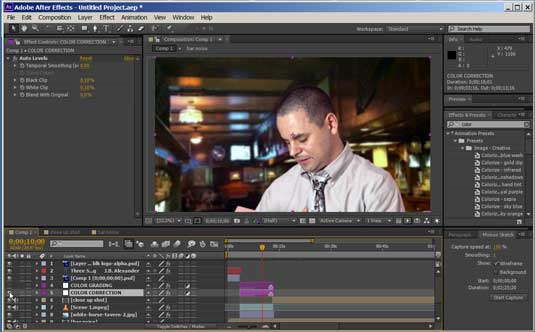
The following image shows the Color Correction adjustment layer turned on. You can see I took the easy way out and simply used an auto (use scopes to check, and blend with original to back off a bit).
In the final image we have added the Color Grading, which I chose to do with the CC Color Neutralizer filter as it allows good adjustment controls with real time visual previews:
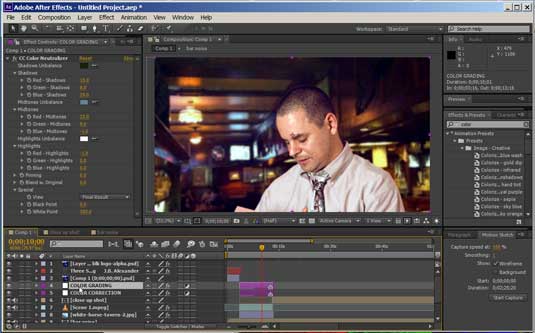
You can see I've warmed the skin tones and given a richer feel to the whole scene.
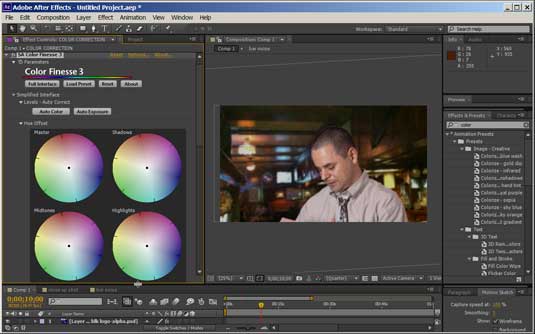
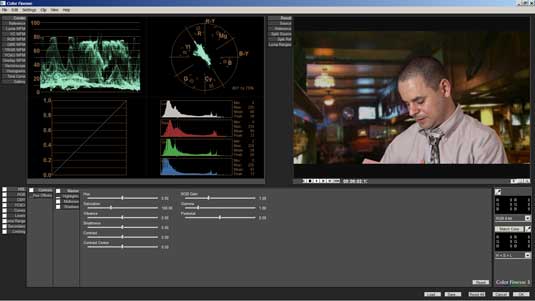
Color Finesse
Perhaps a better option: After Effects actually ships with a limited edition version Color Finesse, found in Effects>Synthetic Aperture. This offers two work views. The first is a simple one that keeps you inside After Effects:
The second is an advanced one that takes you out to Synthetic Aperture's own interface:
Since most editing work is done in programs like Adobe Premiere or Apple's Final Cut Pro, you will need to bring your content from those programs over to After Effects, and often, back again.
Adobe's suite of tools makes this relatively easy with its application linking. We are told that ProRes 422 round-trips from Final Cut Pro to After Effects and back again with few problems.
Further reading
- How cinematic color grading is actually done
- Color grading in passes
- Color grading in layers in Adobe Premiere Pro, After Effects or Speedgrade
- Primary Color Correction video by Andrew Devis
- Secondary Color Correction video by Andrew Devis
- Vectorscope in AE video by Andrew Devis
Words: Lance Evans
Lance Evans is creative director of Graphlink Media. He has written books on 3D, and produced the 3DNY Seminars for Apple and Alias.
Delivered in conjunction with ZED!
This content was produced in collaboration with HP & Intel as part of ZED - a Pop-Up Studio for the Creative Community held in Soho, London. For more information about ZED and any future events see here.
Related articles
Adobe After Effects Color Correction
Source: https://www.creativebloq.com/audiovisual/master-colour-correction-and-grading-after-effects-10134701
Posted by: christensenplousee.blogspot.com
0 Response to "Adobe After Effects Color Correction"
Post a Comment