

How To Add Backup Camera To Ford Sycn Wire Harness
(add together disclaimers, risks and caveats here about what harm yous could do or warranties yous could void or laws you could break by messing around like this)
Direct to FordEdgeForum - another first install - the new plug-n-play (yeah, you can now do it yourself) rear view Back up Camera to the manufacturing plant Navigation Organisation offered by AV Electronic (click here). Thanks to Sam, the owner, my plug and play unit was one of the very outset sent out a calendar week ago Friday on their official release day and past the time I had it working by this past Fri, only 1 other person - a dealer - had the new release "plug and play" unit of measurement working before me. So, for your enjoyment, here it is. Install details, products details, tips, info on the starting time and only know true DIY plug and play selection to add a backup camera to or manufacturing plant nav systems. I call up, even with the camera, y'all will agree this setup looks as mill as you could get and the camera is almost non fifty-fifty noticeable. Enjoy!
Products:
1. I used the "Budget Version" of the Navigation Video/Photographic camera (Dual input) Interface as I only planned to run the backup camera and perchance a DVD player
ii. I used the Power Acoustik CCD-4XS Rear View Color Camera. I did MASSIVE research on a camera that met my requirements (1) tiny - this thing is only about 1x.75x.75 (two) CCD all-time quality versus junky CMOS (3) adjustable pivot point. I defy someone to observe a rear view camera any better, smaller, quality than this. I call back you will concord when you come across the final results. The only other option to consider is a license plate frame photographic camera (which I accept one to sell (click here) as I constitute a license plate frame I simply had to have then could not utilise the camera).
Camera Install:
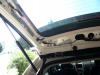
The photographic camera is the bomb. Period. Anyone wanting to exercise this, just save your fourth dimension and attempt and purchase this photographic camera as information technology worked perfect and meets every goal (only night vision - which I did not care about given where I planned to place it which was correct between the rear license plate lights which are bright LED in my instance) you would want in a camera. Install was non so bad, but takes a lot of time. I would say to do information technology right, three perchance 4 hours at most merely for the photographic camera. You desire to understand wiring and talking molding and such apart before installing a rear view camera. You have to remove the within of the rear gate (piece of cake, 4 screws). I had decided long agone to put a camera under the emblem in the piddling recessed alcove. It just so happens, there is a little "plug" there that I was able to pop out, adhere the camera to, and plug back in with a few modifications. Like information technology was taylor fabricated just for this mod. It even angles downward towards ground so makes perfect angle. I then had to drill 1 hole in the within of the gate to pull through the cable that run power, ground to camera and run to the front of the car to attach to the RCA video input. I ended up using silicon around the hole when I had information technology all setup to (1) keep the cables from getting cut or sliced over time with jostling and (2) brand it weather condition proof - though I doubt that is even an issue given how information technology is installed with photographic camera lower than cablevision and under the alcove. I had to run all of the cables and I ended upward taking blackness (ground) and drilled a second tiny hole in the kicking and fastened the ground to that after sanding away and exposing the metal nether pant for a solid ground. I and so ran the camera power to the drivers side backup lamp (height most lamp) every bit you accept piece of cake access to that low-cal. The color of the wire you tie into to go ability to the camera only when the automobile goes into rear is: green/white in the bundle that goes to the rear light. Both of these wires I pulled through the safe wire bundle protection sleeve that allows wires to run from hatch to auto body. Every bit for the actual thicker camera RCA wire, that was to call back so I ran it behind that sleeve and zip tied it. It is clean, you lot cannot even come across it really. This leaves the camera wire in the caput liner. I then ran this camera wire over to the drivers side molding, along the rear window and downwards the colonnade backside the passenger on drivers side and into the flooring, along the flooring molding - popping upwards molding to run clean hidden wire where needed and then right up to the kick plate at the fuse box. it is make clean, you lot cannot see a unmarried wire. There is PLENTY of camera wire to exercise this. Pictures show all of this.
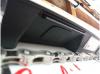
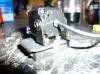
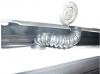
can you believe this perfect placement port. like it was fabricated for this.
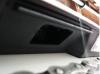
hole for camera harness wire to be pulled through
a few shots of attaching camera to that popped off port door.
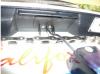
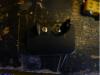
taped up wire from camera along gate and into open up holes into wire bundles sleeve. power wires goes off to light, basis hooked right to gate and the plastic molding hides it all.
notice the red power wire from the camera, it ties into that green/white wire and will merely et ability when car is in reverse.
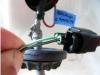
here is the sleeve bundle, power and basis run through this into auto, but notice very close the actual thicker photographic camera wire runs forth information technology's backside as it cannot hands be pulled through the sleeve.
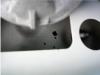
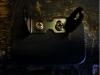
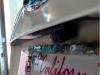
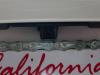
a few shots of the mounted camera. pretty flush, hidden, barely noticeable...
AV Electronic Video Input Box Install:
This organization works awesome and exactly every bit claimed. Also, not like you lot have a lot of options as they are first to market with a plug and play DIY kit. I know, I called all other places. Sam, the owner of the company, is super helpful and very nice to bargain with. We had to talk a few times during the 2nd role of install, the video converter box, as it was the first time install for anyone other than 1 other dealer and there were some small bugs to work out and he was a champ nearly helping me. Even stayed belatedly into night - he is 3 hour time unequal - to work out some plaguing kinks. Now I will say this at present, this is Not an install for the meek and unskilled. It takes patience, a very steady hand, small-scale screw drivers, a low-cal touch and diligence as you are working in VERY pocket-size tight spots with very modest and tight tolerances. If I were rating the install of video input to the nav unit, I would rate it a difficulty of 7-8 out of ten for electronics and wiring and such. it is tough. I think most might end up having a store or dealer do this, but for those of u.s.a. that can and do like to wire and mess with electronics, it is doable. Only fix bated 2-iv hours to practise this as tying the input box to the nav unit of measurement is the tough part, hooking upwardly the camera to the box and powering the box is a cake walk. Then, with this production, you get 3-4 pages of instructors so I will not go through all of that hither. I will gladly help with specific quesitons if you come up up aganst a wall and want aid, but the directions are pretty good. I volition take some tips hither, but I will not recount the step by step they provide. But, the highpoints are... the install is 2 parts, the box and the ribbon cable to the nav unit. It is nice as there are several connection points and then you lot can tie it all together in segments and check and recheck connections if things practice not go well rather than pulling it all out. So, to do this, y'all must remove the center console (it pops off super duper easy and the entire center piece comes off easy). This will expose a huge alcove in the dash and the DVD nac unit of measurement. Remove bombardment cable to neg to plough power off to auto!!! yous remove the DVD nav unit with 4 elementary bolts, undo 5 cables in the rear of nav unit of measurement and remove it. Then, the tough office. You must substantially weasel a small bundle of wires into an existing pigsty in the side of the nav unit (which is actually the nav, cd, radio, stereo, all in i). Fish that out through the front of the nav unit afterwards you lot remove the screen and disconnect the ribbon cable. The betoken is, you will remove the ribbon cable, jump there new ribbon cablevision into that, reconnect the older ribbon to their new ane, tie that bundle of wires into the new ribbon cable that has a female parent board on that, SOFLTY squeeze all of this back into a tiny opening the original factory ribbon cable came out of.... and out it all back together. Simple? Not really so much. So, as I say, their directions step yous through all of this but here are three CRUCIAL tips I would add together that: TIP ONE for step 7... this bundle of wirs that has the white connector that attaches to the female parent board is not a snug connecting fit and when you go to stride 7 and attempt to push it all back into the ribbon slot, if comes apart every bit it is a VERY tight tolerance with the added majority of the wire bundle, tiny motherboard, and ribbon cablevision. Then, what I did was brand sure that connector lined upwardly perfect - that is crucial as that connector is ultra precise and imperative information technology is straight, fifty-fifty and lines up. And the tip is I added some quick dry silicon glue to concord the connexion together. Electrical record might work, but I but decided to utilise glue to be safe. All other connections you take to make have press fit holders and such, merely that i. so that is what I found made it firm 100%. TIP TWO for pace 7... when you are pressing all of this stuff back into the slot the unmarried ribbon cable came out of before, you look in and see what looks like a piece of paper. It is not. what it is is the ribbon cable that powers upwardly and runs the DVD nav unit! So, the tip is be very slow and conscientious. do non push difficult and maybe angle the whole package to the right slightly and work effectually that. I know as I disconnected that cablevision and had to take apart the entire factory unit of measurement to reconnect it. You do Not want to brand that error. Once yous go by that and button information technology all up and follow the remainder of the directions, you move on to part 2 and that is firing upwardly the actual video box that this whole new wire bundle attaches to. Here is where I will requite TIP 3.. on the concluding page of directions Step ii you tie that new package of wires into the main wire that goes to the input box. This is a 2 connectors:f 4 to four pin and 5 to 5 pivot males/female person connectors. the tip is be very conscientious and crucial with this connection too. I did not exercise it precise enough and that will atomic number 82 to discoloration of the nav arrangement when you turn information technology on as those 4/iv and 5/five provide the color video. So, be sure to brand those squeamish and clean, electric tape them together to be rubber and goose egg tie or tape them to the vent pipes you will see in the center console cavity. Other than necktie, connect he main connector to the input box and then to power the input box you run the black to a basis (I did an exposed bolt), you run red and blue together to the ruby power wire that sticks out of the camera RCA wire to ability the box when you shift into reverse, attach the camera RCA wire to "video ii" port, and then leave the yellow as that will be used for those that want to run a DVD thespian or other video item I exercise not notwithstanding, only will this calendar week. Since the nav unit of measurement ribbon cable bundle comes downwardly through the open cavity in the dash and pops-out at the flooring by the drivers anxiety (at least, that is how I did it) I and so hid all of this under floor carpet and put the small nav box in a niggling spot that it fits perfect in right backside the center console dash at your feet (gas pedal to exist more precise). Pictures show some of this.
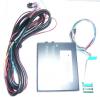
here is the minor box with two ports, the ribbon cable + tiny wire package (right) and the main harness that ties the ribbon cablevision into the box (left)
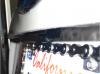
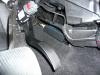
see the box hidden to the right of the gas pedal behind the dash? I put a few strips of blackness electrical tape merely to blend it in as the box is bluish.
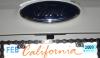
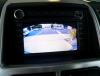
and this is what you become... how cool 
Edited by Lex Talionis
Source: https://www.fordedgeforum.com/topic/2768-backup-camera-install-into-factory-nav-unit/
Posted by: christensenplousee.blogspot.com
0 Response to "How To Add Backup Camera To Ford Sycn Wire Harness"
Post a Comment